Keeping My House From Burning

Late last year my family and I moved to a two story, 1970’s era house on 1 1/2 acres of land. Since then I’ve been thinking about retrofitting the house with Ethernet cable to most rooms. This is just one of many projects I have planned to update the house and add a few “smart home” features to make management of it and the property easier.

But before I can move on to the fun stuff (or the Ethernet cabling which I don’t consider much fun) there are a few projects that have to be finished out of necessity. I undertook one of them last weekend in the hopes of preventing the house from burning down. Let me explain.

A couple of months ago we finished up a project converting the garage into livable space. In the process of the renovation we discovered that the existing 30 amp dryer circuit was wired using aluminum wire. This wasn’t necessarily a bad thing since the wire was sized right but our building inspector wanted to see a four prong dryer outlet which meant running a new four wire cable.

So my electrician pulled the breaker and put in a new circuit. That problem was solved but now, all of a sudden, my irrigation pump wasn’t getting power. We started poking around and discovered that someone, years ago, had simply continued the dryer circuit from the laundry room, through the wall and out to the pump.

This was a major problem for two reasons:

1. The spliced-in wire going to the pump was only 12 gauge which is only big enough for a 20 amp circuit.
2. The splice combined copper and aluminum wires under the same screw.

The smaller gauge wire basically caused it to act as a giant fuse that, technically, could have burned up. Almost all of it was in conduit, however, so it probably wouldn’t have caused much damage. But it was still a problem.

The bigger issue to me was the mixing of copper and aluminum wire. That combination can lead to a chemical reaction called electrolysis which can cause oxidation, which increases the resistance of the wire dramatically leading to excessive heat build-up and potentially causing a fire.

None of this was of immediate concern since the circuit was dead and the dryer was on its own now. But I needed my irrigation pump back on so I could:

1. Keep my landscape from dying.
2. Put in an automatic irrigation system and potentially add wifi connectivity so I can turn my sprinklers on from Fiji – just in case I need to.

Thankfully my irrigation pump only needed a 20 amp circuit so the 12 gauge wire could stay. I also wanted to reuse the existing aluminum wire since it wouldn’t cost anything to keep it and it was already run through the house. All I really needed to do was take care of the aluminum to copper problem. There is a special connector called Alumicon but my aluminum wiring was too big (8 gauge) for it.

I opted for tin-plated aluminum splicing blocks which are approved for both copper and aluminum wire. The copper wire goes in one side of the block and gets screwed down while the aluminum wire goes in the other side and gets secured. The two metals never touch! Wrapped with some rubber splicing tape they actually look pretty good.

Now I can water my grass, not worry about my house burning down (at least for one reason) and start thinking about my next, hopefully more fun, project. Not a bad weekend.

Please Update Old ESRI JavaScript API Samples

I’m confused – why does ESRI insist on keeping JavaScript API samples written in a legacy (non-AMD) module require style? I can understand keeping the legacy code in the API reference since a lot of developers probably wrote a lot of code using it. But current sample code should reflect current programming styles. And yes, the samples I’m talking about are the current ones.

ESRI Javascript API screenshot

Somebody actually goes in and updates the CDN reference to the current JavaScript API. Would it be that difficult to convert the requires to an AMD wrapper and change a few module references? Just a thought.

Building a Stubborn Driver: An Ubuntu Adventure

I was confused, frustrated and defeated. My back was on fire and I could barely feel my legs. If there had been a bed within range I would have crawled in, closed my eyes and tried to forget the last five hours I had sat trying to build Linux drivers for my son’s new USB wireless adapter. It didn’t work. Nothing was working!

Wireless Adapter
Now I’m no Linux expert but I can usually figure out how to make the OS do what I need it to do. In this case it should have been simple – just make and install the source files and maybe change some setting on another file. But things went wrong from the beginning.
It was Saturday and I anticipated getting the project done fairly quickly. I had actually tried to get the WiFi working the day before but I was trying to do it without a wired connection to help out. I had just installed Ubuntu 14.04.03 and I really didn’t think I would have any trouble.

The open source drivers that come with Ubuntu take care of most of the hardware I want to use. But this particular wireless adapter was a plug-in USB with a proprietary driver that had to be compiled by hand. The adapter came with one of those mini-cds. It had three folders with drivers for Linux, Windows and Macs.

The windows and mac folders had exactly one file that you can click on to load the driver. I’ve used this adapter on a windows box and it works really well. All you have to do to get it working is double-click the executable and away you go. On Linux you have to build the driver from source code. So we’ve gone from one .exe file to about 450 files that you have to figure out how to put together and get to work. OK, but this is Linux. That’s what you expect from an open source OS.

But even building drivers shouldn’t be that difficult if you know basic Linux commands, how to traverse directories, edit files and use Make. Still, with such a large user and contributor base (for Ubuntu) you would think someone would have made the process for this driver a little clearer. Here are the build instructions that came with the adapter:

Build Instructions:  
====================

1> $tar -xvzf DPB_RT2870_Linux_STA_x.x.x.x.tgz
    go to "./DPB_RT2870_Linux_STA_x.x.x.x" directory.
    
2> In Makefile
	 set the "MODE = STA" in Makefile and chose the TARGET to Linux by set "TARGET = LINUX"
	 define the linux kernel source include file path LINUX_SRC
	 modify to meet your need.

3> In os/linux/config.mk 
	define the GCC and LD of the target machine
	define the compiler flags CFLAGS
	modify to meet your need.
	** Build for being controlled by NetworkManager or wpa_supplicant wext functions
	   Please set 'HAS_WPA_SUPPLICANT=y' and 'HAS_NATIVE_WPA_SUPPLICANT_SUPPORT=y'.
	   => #>cd wpa_supplicant-x.x
	   => #>./wpa_supplicant -Dwext -ira0 -c wpa_supplicant.conf -d
	** Build for being controlled by WpaSupplicant with Ralink Driver
	   Please set 'HAS_WPA_SUPPLICANT=y' and 'HAS_NATIVE_WPA_SUPPLICANT_SUPPORT=n'.
	   => #>cd wpa_supplicant-0.5.7
	   => #>./wpa_supplicant -Dralink -ira0 -c wpa_supplicant.conf -d

4> $make
	# compile driver source code
	# To fix "error: too few arguments to function ¡¥iwe_stream_add_event"
	  => $patch -i os/linux/sta_ioctl.c.patch os/linux/sta_ioctl.c

5> $cp RT2870STA.dat  /etc/Wireless/RT2870STA/RT2870STA.dat
    
6> load driver, go to "os/linux/" directory.
    #[kernel 2.4]
    #    $/sbin/insmod rt2870sta.o
    #    $/sbin/ifconfig ra0 inet YOUR_IP up
        
    #[kernel 2.6]
    #    $/sbin/insmod rt2870sta.ko
    #    $/sbin/ifconfig ra0 inet YOUR_IP up

7> unload driver    
    $/sbin/ifconfig ra0 down
	$/sbin/rmmod rt2870sta

I started by simply trying to make the driver according to the instructions above. But the process kept showing an error and acting like it couldn’t find certain files that should have either been included or created when the make command was run. So I went searching “How to compile RT2870STA driver”. There were a lot of sites giving basic instructions about how to build the driver and it seemed like it should work fine. What I didn’t notice were the dates of most of these articles. They were pre 2010.

I finally came across a newer post that explained this driver was built with an earlier Linux kernel in mind (2.x). In the 3.x kernel, some functions that are referenced by my driver source files were re-named! Then I finally did what I should have done from the very beginning: I got specific. I searched “How to compile RT2870STA on Linux 3.19 kernel”. This seemed like a god idea at the time. In fact, it yielded a great blog post that provided a patch that supposedly would fix the discrepancy in the driver files. But for the life of me, I couldn’t even get that to run.
It was at that point I became too frustrated and defeated to continue. My entire day had been wasted. My kids were complaining that they hadn’t seen me all day. My wife was giving me that concerned “Oh dear, he’s trying to do smart people things again” look. Even my dog seemed annoyed at me that I had spent more time typing “make install” than I had spent throwing her ball.

So I gave up and took a few days away from my little project and did some other tasks that were just slightly easier for me like taking out the garbage. Then, Saturday morning I thought why not give it one more try? So I searched “How to compile RT2870STA on Ubuntu 14.04.03”. It was like magic! The very first result was a post on ubuntuforums.org that explained everything in a few simple steps. It seems there were two functions that had been renamed in newer builds of Ubuntu. I had to edit a file in one of the driver folders and change the names of a couple functions. I then ran Make again and voila, my adapter was up and running.

Looking back I realize I’ve learned (and re-learned) a lot about working with Linux. I now have much better terminal skills. I understand driver compilation processes better and how they interact with the kernel. I also reinforced my belief that an Ethernet connection to the internet is always superior to wireless, although inconvenient.

Are Linkedin Background Photos Worth the Trouble?

With Linkedin allowing background photos for your profile you now have one more way to express yourself creatively on the platform. But Linkedin isn’t Facebook. It’s a professional network and is typically understood to have professionally presented profiles. Having a clean, flat layout with a simple blue and grayscale color scheme has helped keep Linkedin profiles in line with that strategy.

Before background photos the worst offense a user could do visually was insert Homer Simpson as their profile picture. Now we are given the power to screw up a much larger portion of our profile’s real estate.

Is it worth possibly reducing the professional look of your profile just to “express” yourself on one more social channel? Or is it worth the time and effort it will take to produce an image that will still project the professionalism that a plain background already does? The answer to both of these questions is – probably not. I doubt that a connection, employer or recruiter will give a second thought to your profile header not having some sort of graphic behind it. A good head shot as your profile picture will, however, still be expected.

But that doesn’t mean that you absolutely shouldn’t use a background photo. If an image is well thought-out and conveys important information upfront to someone viewing your profile, it could be very worthwhile. Putting in a picture of balloons, sunsets or your dog will probably only serve to distract viewers. However, a picture of you speaking at an event gives the impression that you’re an expert in your field and have experience with public speaking. Likewise, a picture of a map might strengthen the profile of a cartographer or GIS professional.

When someone views your profile, your title and profile picture are usually the first things they see. As we all know, first impressions can make a real impact. If you can influence that first impression positively, then the extra profile eye-candy could be an asset.

I’m still on the fence about whether to put a background photo on my own Linkedin profile page. At this point in time I think Linkedin background photos are a bit of a risk for both Linkedin and its users. While profile customization can make your page look nice, it also runs the risk of making it look like a wannabe Facebook page. That’s not in keeping with the feel of Linkedin. If you do decide to add a background photo, keep it simple and above all, relevant to the rest of your profile.

C is for Crash

There are those moments when you realize that certain sports just aren’t worth it. I spotted this encouraging sign in a pile of old junk while hiking a local ski resort in the off season. It does encourage me not to crash but mostly by convincing me not to take up skiing.

Cookie Monster with Broken Arm


I wonder how long it took for someone to realize that instilling terror in your patrons isn’t a good marketing ploy.


Tourist Pine to Fly Drones in Antarctica? Weird!

antarctica

The International Association of Antarctica Tour Operators is cautioning all potential travelers to Antarctica who pine to fly a drone to check with their travel agent or tour operator before packing their device.  – The Washington Times

Tourists are pining to fly drones in Antarctica? What kind of tourist pines to fly drones in Antarctica? The bigger question is who uses the word pining anymore?

Is IE on its Last Legs?

Internet Explorer logo

Tidings of a new browser coming from Microsoft have some wondering whether IE is on its last legs. The sad news is that there are still so many old versions (7, 8 and 9)  sitting on millions of computers, and their users don’t know any better. So even if Spartan, or its children, eventually displace Internet Explorer, front-end developers will be playing patty cake with old versions for years to come.

It’s interesting that Microsoft is coming out with a brand new browser when IE11 has so many improvements and seems much less maligned than its older versions. Makes me think maybe this is just the start of a rebranding effort.


Further Reading:

http://www.computerworld.com/article/2863746/what-microsofts-fresh-start-browser-strategy-means.html

Letterboxing as an Introduction to Navigation and Location

Letterboxing is an old activity, somewhat related to both geocaching and orienteering. It involves navigating from a given starting point to a cached box containing a log book and a rubber stamp. Navigation consists of anything from following riddles and printed clues to compass directions and distances.
The low-tech nature of letterboxing is one of its attractions. You do not have to have a GPS device or any specialized equipment. A compass is really all you might need.
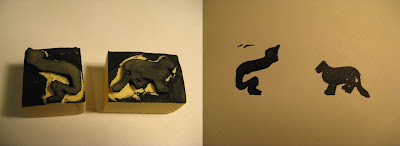
Once a letterbox is found, the letterboxer uses the stamp in the box to mark his log book and marks the box’s log book with his stamp. Each letterboxer also comes up with a trail name. The trail name coincides with your stamp identity and allows others to follow your hunts. Here is a picture of the stamps I made with the family. The cat is our family stamp and the snake is one my son drew for himself. I carved both of them out of a $1.26 art gum eraser.
homemade letterboxing stamps
Many letterboxers carve their own stamps. Here are my not so artistic attempts
Once my seven year old son caught on that letterboxing was like going on a treasure hunt, he was easily convinced to learn the skills necessary to find the boxes. It only took him a minute to learn how to shoot a rough azimuth with my compass. I wrote out some basic directions including azimuths and number of paces from point to point throughout the house. He was successful in navigating through the house and finding a couple of baseball cards I had hidden for him.
I see letterboxing as a great way to introduce my younger children to the world of land navigation and location awareness. It might help them later to appreciate geocaching and orienteering which I would love to get them involved in.
The best place to find out more about letterboxing is Letterboxing.org. The site details history, etiquette, materials needed and rules of the game. More importantly it provides a list of letterbox cache sites and the instructions to find them. If there are no locations for your area, by all means go out and create some.

Getting Your Bearing In A Digital World

There is no doubt we live in a geospatial age. We are inundated with location based data wherever we turn. While some mapping applications like OpenStreetMap appeal to targeted users, others such as Google maps, Bing Maps, Yahoo Maps and MapQuest are main stream and are accessed by millions of users every day. But are people any more spatially aware of surroundings even with these tools and GPS units in every car and smartphone?
North
North is up there
I run into people all the time who can follow a GPS that says turn right on Smith street but couldn’t tell you what directions Smith street runs to save their lives. It could be said that we are actually losing our directional abilities. Google maps doesn’t even give bearing throughout your route. There is only one bearing at the beginning of the directions. The rest of your route is made up of “Left”, “Right”, and “Take Exit…”
Okay, so what? If we have the tools to get us from point A to point B, why should we care if our driving map has a compass rose on it? Well, here are three reasons I think directional aptitude is still important:
  1. Mapping technology is unreliable. Online maps are only as good as the data human beings put into them.
  2. Data may not always be available. Even with mobile technology there are times when digital maps and directions will not be at your fingertips. Batteries die, charging cables are forgotten and phones are left behind on counters.
  3. Having your bearing is a safety issue. Knowing your location relative to another location can be a matter of safety. Emergency services can find you easier if they know you are north or south of a particular intersection.
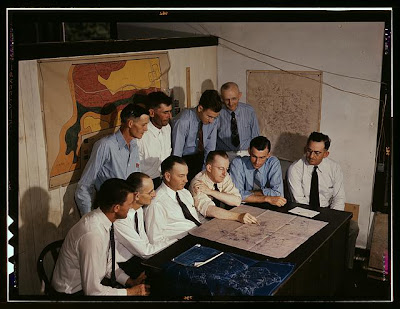
Map meeting
So how can directionaly challenged individuals build back their sense of bearing? Here are three things that might help:
  1. The sun rises in the east and sets in the west. Knowing just this piece of information can help a person get their bearing for a good portion of the day. Face a rising sun and west is behind you , north is to your left and south is to your right. With practice, directional orientation will become second nature.
  2. In town, pay attention to N,S,E,W on street signs. That paired with increasing or decreasing block numbers will give you a direction.
  3. Get in the habit of using paper maps. You will remember street names and landmarks in relation to a map’s compass rose.
Modern computer mapping has revolutionized our world today. While the internet and geospatial technologies are indispensable in much of our daily lives they have also taken away some of our ability to think for ourselves. Fortunately it is not difficult to reclaim that lost territory.

What is in Your Office Desk Drawer?

I took a look in the top drawer of my desk at work the other day. I’m not talking about the glance you give when you throw something in that you might need “someday”. I actually looked at what was in there. It was kind of scary what I had let accumulate. Here is a partial list of what I found:
  • Box of pushpins
  • Obsolete Autodesk, ESRI, and Trimble trial software and drivers from 3 years ago.
  • Short, flathead screwdriver
  • A Spaceghost Christmas ornament
  • Organic white tea bags (about 6 of them)
  • 12 inch ruler (I actually use this from time to time to measure margins, boxes, icons and other elements on printed maps)
  • 2009 statistical abstract of the United States
  • Four USB cables from unknown hardware purchases
  • Engineering ruler
  • Box of plastic forks
  • Bottle of instant Krazy Glue
  • More than eleven pens from geospatial conference vendors
  • Scissors
  • 12 volt power supply to something I probably threw away in 2010
  • Crossword puzzle book
  • Seven lip balm containers (Six were empty)
  • PS/2 to USB adapter
  • Sunscreen
  • Some flashy button thing from a conference
  • Various sizes of sticky note pad
Contents of my desk drawer
This was just the top drawer. I’m kind of afraid to get into the bottom two. It looks like I am going to have to do some winter cleaning pretty soon.

I am sure there are plenty of more interesting desk drawer content lists out there so leave a comment and let me know what’s in yours.